The satisfying crunch of air-fried dishes has made air fryers a staple in modern kitchens, transforming how we approach healthy and convenient cooking. Yet, like any intricate appliance with moving parts and electronics, an air fryer is an investment you want to protect. Understanding your air fryer’s warranty is not just about reading the fine print; it’s about securing your peace of mind and ensuring your crispy favorites remain a joy, not a headache. Appliance breakdowns can be frustrating and costly, but a solid warranty acts as your safety net, safeguarding against unexpected defects and offering a clear path to resolution.
Understanding Your Air Fryer Warranty: The Basics
An air fryer warranty is essentially a manufacturer’s promise. It’s a guarantee that for a specific period, your appliance will perform as intended. Should any covered defects arise during this time, the manufacturer commits to repairing or replacing the unit at no additional cost to you. This provides crucial protection, especially for appliances with components like fans and heating elements that, despite robust design, can sometimes fail prematurely.
What is an Air Fryer Warranty?
|
Our Picks for the Best Air fryer in 2026
As an Amazon Associate I earn from qualifying purchases.
|
||
| Num | Product | Action |
|---|---|---|
| 1 | Cosori 9-in-1 TurboBlaze Air Fryer 6 Qt, Premium Ceramic Coating, 90°–450°F, Precise Heating for Even Results, Air Fry, Roast, Bake, Broil, Dry, Frozen, Proof, Reheat, Keep Warm, 120V, Dark Gray |

|
| 2 | Chefman Air Fryer – 6 QT Compact Airfryer for Quick & Easy Meals in Minutes, Features Hi-Fry Technology for Extra Crisp, Touchscreen Controls with 4 Presets, Nonstick & Dishwasher Safe Basket - Black |
|
| 3 | Chefman TurboX 4-in-1 Air Fryer, 5-Quart Airfryer for Extra Crispy Chicken, Fries, Wings, and More, Air Fry, Bake, Reheat, and Frozen Functions, Digital Touch Controls, Dishwasher Safe |
|
| 4 | Ninja - Air Fryer - 4 QT Capacity - 4-in1 Roast, Crisp, Roast, Reheats, & Dehydrates - Dishwasher Safe Parts - Includes 20 Easy & Healthy Recipes - Compact - Grey - AF101 |
|
| 5 | Cuisinart Air Fryer Toaster Oven, 1800W, 8-in-1 with Air Fry, Convection, Broil & Warm, 0.6 Cubic Feet, 60-Minute Timer, TOA-70NAS, Stainless Steel |
|
| 6 | Ninja Air Fryer, 8 QT DoubleStack 2-Basket, Space Saving Design, Cooks 2lb Chicken Wings, Feeds up to 6 People, 6-in1 Air Fryer, Roast, Bake & More, Easy to Clean, Dishwasher Safe Parts, Black, SL201 |
|
| 7 | Ninja - XL Single Basket Air Fryer - 5.5 QT Capacity fits 3lbs of Wings - 5-in-1Air Fry, Roast, Bake,Reheat & Dehydrate -Dishwasher Safe Parts & Recipe Guide - Grey -AF150AMZ |
|
| 8 | Ninja Crispi Pro 6-in-1 Glass Air Fryer - 450°F, Nontoxic, 6qt & 2.5qt Containers & Lids - Microwave, Freezer, Dishwasher Safe - Max Crisp, Air Fry, Bake, Roast, Recrisp, Dehydrate -Cyberspace AS101CY |
|
| 9 | bella 4Qt Slim Air Fryer, Fits-anywhere™ Kitchenware, EverGood™ Ceramic Nonstick Coating, Adjustable Temperature, 6 Preset Cooking Options, 60 Min Auto Shutoff w Audible Tone, 3.3lb Capacity, Oatmilk |
|
| 10 | Ninja - Air Fryer - 4-in-1 Pro Air Fry, Roast, Reheat, Dehydrate - 5QT Capacity fits up to 4lbs of French Fries - 400F Max Temp - Nonstick Basket & Crisper Plate - 120V - Grey - AF141 |
|
At its core, an air fryer warranty is a legal agreement from the manufacturer to stand behind the quality and performance of their product. It covers specific types of failures or defects that are deemed the manufacturer’s responsibility, ensuring that you, the consumer, are not left with a faulty appliance shortly after purchase. This guarantee is activated from your date of purchase and typically spans a defined period, offering a safeguard against unforeseen issues.
Why a Warranty is Crucial for Your Air Fryer Investment
Investing in an air fryer means more than just buying a kitchen gadget; it means investing in a lifestyle of healthier, easier cooking. A warranty protects this investment by mitigating the financial risk associated with potential malfunctions. Without one, a sudden breakdown could mean either a costly repair out of pocket or the need to purchase an entirely new unit, negating any initial savings or benefits. It ensures that if something goes wrong due to a manufacturing fault, your path to a functioning appliance is clear and covered.
What Your Air Fryer Warranty Generally Covers
Most air fryer warranties are designed to cover issues stemming from the manufacturing process itself. This focus ensures that you receive a product free from inherent defects that could compromise its functionality and lifespan. Knowing these common areas of coverage helps you understand when you are entitled to a repair or replacement.
Manufacturing Defects and Material Flaws
The primary focus of most air fryer warranties is to protect against manufacturing defects and flaws in the original materials used to build the appliance. This means if your air fryer fails because a component was incorrectly assembled, or if a material was inherently weak or faulty from the factory, the warranty should cover it. These are issues that are not a result of wear and tear or user error but rather problems present from the moment the product was made.
Key Component Failures
Beyond general defects, warranties often specifically cover the failure of critical components that are essential for the air fryer’s operation. These include the heating element, which is responsible for generating the hot air, the fan that circulates it, and the control panel or digital display that allows you to set temperatures and cooking times. If these vital parts stop working due to a defect, they are typically eligible for repair or replacement under warranty, ensuring your appliance can continue to cook effectively.
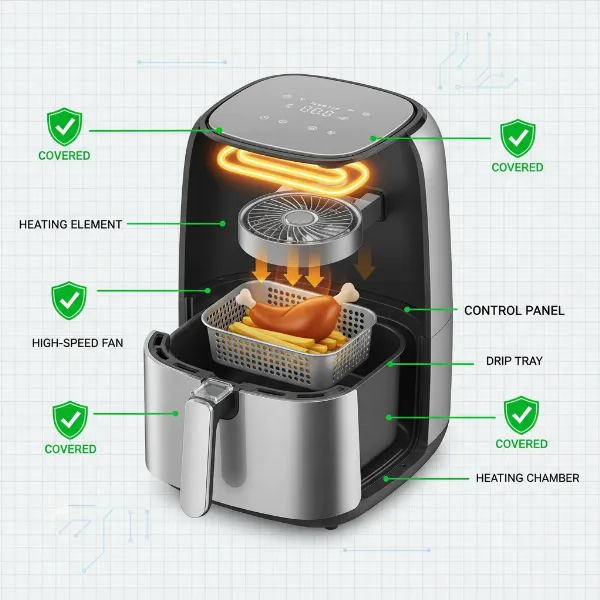 Illustration of an air fryer highlighting internal components covered by warranty like heating element and fan.
Common Exclusions: What an Air Fryer Warranty Typically Doesn’t Cover
While warranties offer valuable protection, it’s equally important to understand their limitations. There are specific scenarios and types of damage that manufacturers typically exclude from coverage, often because they fall outside the realm of manufacturing faults. Misunderstanding these exclusions can lead to unexpected repair costs or a voided warranty.
Normal Wear and Tear vs. Defect
One of the most frequent exclusions is “normal wear and tear.” This refers to the gradual deterioration of an appliance that occurs through regular use over time, such as minor scratches, fading, or slight reductions in efficiency that are not due to a defect. A warranty distinguishes this from a manufacturing defect, which implies a flaw present from the start. For example, if a non-stick coating gradually wears down after years of use, it’s generally considered wear and tear, not a warranty issue.
Accidental Damage and User Misuse
Accidents happen, but air fryer warranties typically do not cover damage caused by drops, spills, power surges, or other forms of accidental impact. Similarly, damage resulting from misuse or improper operation—such as using the air fryer for purposes unintended by the manual, neglecting safety guidelines, or exceeding its recommended capacity—will usually void your warranty. Always refer to your user manual for proper usage to avoid these exclusions.
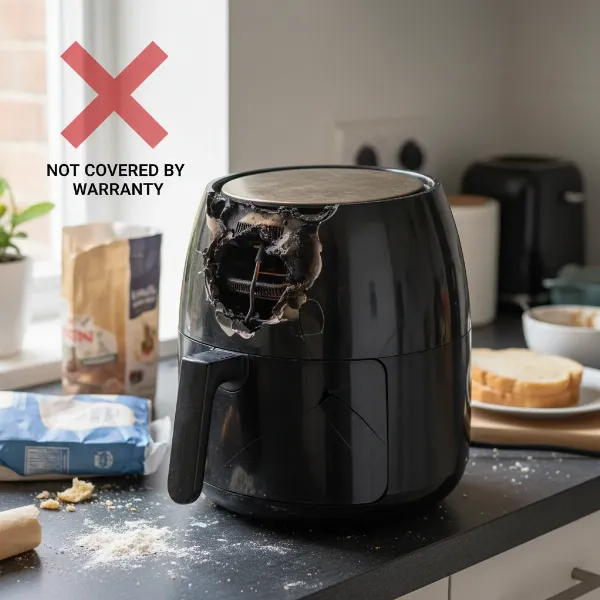 An air fryer with visible damage, representing typical warranty exclusions like accidental damage or user misuse.
Unauthorized Repairs, Modifications, and Commercial Use
Attempting to repair your air fryer yourself or having it serviced by an unauthorized technician can often void your warranty. Manufacturers design their products with specific components and processes, and any alteration or use of non-approved parts can introduce new problems they are not liable for. Furthermore, if an air fryer is designated for residential use but is used in a commercial setting (e.g., a restaurant), the warranty will almost certainly be invalidated, as commercial environments place different, often more strenuous, demands on appliances.
Importance of Proper Maintenance and Cleaning
Just as you maintain your car, regular cleaning and proper care are essential for your air fryer. Failure to maintain the appliance, such as neglecting to clean out food debris or keeping filters clear, can lead to operational issues that are not covered by the warranty. These problems are considered preventable through user care rather than manufacturing defects. Always follow the cleaning and maintenance instructions in your user manual to keep your warranty valid and your air fryer functioning optimally.
Decoding Warranty Periods and Types
Air fryer warranties come in various lengths and forms, each offering different levels of protection. Understanding these distinctions is key to comparing products effectively and ensuring the coverage aligns with your expectations and usage habits.
Standard Warranty Durations: What to Expect
The most common warranty period for air fryers typically ranges from one to two years. More premium or higher-priced models might offer a slightly longer standard warranty, sometimes extending to three years, or even up to five years for select components. While a one-year warranty is standard for many entry-level appliances, aiming for at least a two-year warranty can provide more adequate protection and peace of mind for your investment.
Limited vs. Full Warranties: Knowing the Difference
Most air fryer warranties are “limited warranties.” This means they cover only specific parts or types of defects, as outlined in the warranty documentation, and often exclude wear and tear, accidental damage, or misuse. A “full warranty,” though rare for small appliances like air fryers, would typically offer broader coverage, potentially including all parts and labor, and might even provide a replacement rather than a repair under certain conditions. Always assume your air fryer comes with a limited warranty unless explicitly stated otherwise.
Extended Warranties: An Investment Worth Considering?
Beyond the manufacturer’s standard warranty, you might be offered an extended warranty at the point of purchase. These can prolong the coverage period and, in some cases, expand it to include accidental damage or even cover wear and tear that affects performance. Deciding if an extended warranty is worth the additional cost depends on several factors: the appliance’s initial price, its reliability track record, how heavily you use it, and your personal risk tolerance. For some, the added security against unexpected repairs is a worthwhile investment.
Navigating the Warranty Claim Process
Should your air fryer experience an issue that you believe is covered by warranty, knowing the correct steps to take is crucial. A smooth claim process starts with preparation and understanding the communication channels.
Essential Steps for Registering Your Air Fryer
The first and often overlooked step is to register your air fryer with the manufacturer shortly after purchase. This usually involves visiting the brand’s website and providing your product’s model number, serial number, and purchase date. Registration not only simplifies the claims process by having your details on file but can also activate your warranty and provide proof of ownership, which is invaluable if your original receipt is misplaced.
Gathering Necessary Documentation for a Claim
Before contacting customer service, ensure you have all pertinent documentation at hand. This typically includes your original sales receipt or proof of purchase, which verifies the purchase date and retailer. Having your product’s model and serial numbers readily available is also essential, as these uniquely identify your appliance. It’s also wise to keep your user manual and any original packaging, as these may contain important information or be required for returns or mail-in service.
Filing a Claim: From Contact to Resolution
To file a claim, start by contacting the manufacturer’s customer service department, usually via phone or an online support form. Clearly explain the issue you’re experiencing, including when it started and any troubleshooting steps you’ve already taken. They may offer additional troubleshooting tips. If a repair or replacement is deemed necessary, you will likely be guided through providing your product information and proof of purchase. Maintain detailed records of all communication, including dates, names of representatives, and reference numbers, to ensure a transparent and efficient resolution.
Understanding Service Options: In-Home vs. Mail-In Repairs
When a warranty claim is approved, manufacturers typically offer different service options. Some brands, especially for larger or more premium models, may provide “in-home service,” where a technician comes to your home for repairs. More commonly for air fryers, you might be required to “mail-in” the appliance to an authorized service center. If so, inquire if the company provides a prepaid shipping label and appropriate packaging instructions. In-home service is generally more convenient, so clarify the service type before purchase if it’s a priority for you.
Choosing an Air Fryer with Superior Warranty Support
The quality of a warranty extends beyond its stated duration. A robust warranty is backed by reliable customer service and a clear, efficient process. When selecting an air fryer, consider the overall support you can expect should an issue arise.
Researching Brand Reputation and Customer Service
Before committing to an air fryer, take time to research the manufacturer’s reputation for honoring warranties and providing excellent customer service. Look for reviews that specifically mention experiences with warranty claims, repair turnaround times, and the responsiveness of support teams. Brands known for strong post-purchase support can make a significant difference in your overall satisfaction if a problem occurs. A longer warranty period might sound appealing, but it’s only as good as the company backing it up.
Key Factors Beyond Length: Service Accessibility and Turnaround Time
While warranty length is important, it’s not the sole indicator of a valuable warranty. Consider “service accessibility” – how easy is it to get your air fryer serviced? Does the brand have authorized repair centers near you, or will you need to ship it far away? “Turnaround time” is also crucial; an air fryer sitting idle for weeks awaiting repair diminishes the practical value of its warranty, regardless of its length. Some brands prioritize quick resolutions and efficient service networks, which can be more beneficial than just a long coverage period.
Popular Air Fryer Brands and Their Warranty Approaches
Different air fryer brands approach warranties with varying terms and service models. For instance, Philips often offers 2-3 year limited warranties and has a strong reputation for customer support. Ninja frequently provides a 1-year limited warranty, relying on a network of authorized repair centers. Brands like Cosori typically offer a 2-year limited warranty, often requiring mail-in service, while Instant Pot air fryers usually come with a 1-year limited warranty and are known for good customer service and sometimes in-home service options. Cuisinart can offer more extensive 3-year limited warranties, often with in-home service and highly rated support. Always check the specific warranty for the model you are considering.
Conclusion
Understanding your air fryer’s warranty is an essential part of owning this versatile kitchen appliance. It’s not just about covering defects but about protecting your culinary freedom and ensuring long-term satisfaction. Remember that most warranties cover manufacturing defects and critical component failures, but typically exclude accidental damage, misuse, and normal wear and tear. By registering your product, keeping essential documentation, and understanding the claims process, you empower yourself to navigate any potential issues effectively. When choosing an air fryer, look beyond the price tag and cooking features; consider the peace of mind offered by a reputable brand with a transparent and supportive warranty policy. What features of an air fryer warranty are most important to you when making a purchase decision?
Frequently Asked Questions
How long do air fryer warranties usually last?
Most air fryer warranties typically last between one and two years from the date of purchase. Some higher-end models or specific components may come with extended coverage of up to three or even five years, but a standard one-year warranty is very common across many brands.
Does my air fryer warranty cover accidental damage?
Generally, standard manufacturer warranties for air fryers do not cover accidental damage such as drops, impacts, or spills. These warranties are primarily for manufacturing defects. However, some retailers or manufacturers may offer optional extended warranties that can include accidental damage protection for an additional cost.
What information do I need to make a warranty claim?
To make a warranty claim, you will typically need your original proof of purchase (receipt or invoice), the air fryer’s model number, and its serial number. It’s also advisable to register your product online after purchase and keep all communications regarding your claim for reference.
Can I get an extended warranty for my air fryer?
Yes, extended warranties are often available for air fryers, usually offered by the retailer or a third-party provider at the time of purchase. These can prolong the coverage period beyond the manufacturer’s standard warranty and may offer additional protections like accidental damage coverage or wear and tear that affects performance.
Will opening my air fryer void the warranty?
In most cases, opening your air fryer for self-repair or having it serviced by an unauthorized technician will void the manufacturer’s warranty. Warranties typically specify that only authorized service personnel should perform repairs to ensure safety and proper functioning, and to prevent further damage.